Tech Session: Intro to Remote Workflow
This document will provide you with tools for comfortably using our remote environment (the course server) to develop and test your team's pipeline.
Here's the agenda for today and a cheatsheet.
We will be covering three things today:
- Using the linux command line to navigate directories and files on the course server (and your project directory).
- Installing
VSCodefor coding (if you have not already) and setting up an ssh connection so you can edit code on the course server directly. - Making sure you can access the project data on the course database using psql and dbeaver.
Basic tools for common tasks
We're providing setup instructions and support for "good enough" tools for each of the common tasks in the workflow for this class but if you're comfortable with other tools, feel free to use them.
- Writing code:
- Python: This tutorial introduces
VSCode, an editor with good Python support, and some tools that make remote development easy. - However, feel free to use any editor you want (vim, emacs, sublime, pycharm).
- SQL: In other tutorials, we've introduced psql (for writing sql on the server) and DBeaver or DBVisualizer (on your laptop).
- Jupyter notebooks:
- For now, the easiest way to use jupyter notebooks is through ``VSCode''
- If you're interested, you can use parts of this tutorial to set up
Jupyterthrough a browser on your local machine (but we won't go through it). - Many Python IDEs (such as, Pycharm) have good Jupyter support - feel free to use one of these!
- Share code with your team:
- Use the git command line interface to push to your team github repository. We'll do a github refresher next week.
- Many IDEs (including VSCode) have git integration.
- Run code:
- Run Python code manually in an SSH terminal, either by pasting code into a Python REPL, or running a Python script.
- Some IDEs (such as VSCode) support remote interpreters, allowing you to run scripts in a python instance on a remote machine (here, the course server).
Agenda for today

- Repeat what we did last week: ssh to server, test psql, test dbeaver to connect to the database to make sure we remember.
- Navigating the course server using the linux command line including the very important screen command.
- Using VSCode for remote development
- Remote development concepts - how exactly does all of this work?
Recap from last week:
Let's try repeating what we did last week to get started:
1. Make sure you can SSH to the class server
Using WSL (on Windows) or terminal (on Mac/Linux), connect to the server via the command below (replacing the parameters in curly brackets ({...}) with your info):
ssh {andrew_id}@server.mlpolicylab.dssg.io
or if your private key is in a special place,
ssh -i {/path/to/private-key} {andrew_id}@server.mlpolicylab.dssg.io
Once there, confirm that you're in the right place with the command:
echo "$USER@$HOSTNAME"
This should return your andrew id at the server hostname (mlpolicylab-94889)
:warning: If you get something else, let us know.
2. Make sure you can reach the class database via DBeaver
Using DBeaver (or DBVisualizer), connect to the class database and run:
SELECT
'Hello, my name is '||CURRENT_USER||', and I''m connected to '||current_database()||' via '||application_name
FROM pg_stat_activity
WHERE usename=CURRENT_USER
AND state='active';
This should output a friendly message identifying you on the database.
:WARNING: If you get something else, let us know.
3. Initial setup of VSCode
We'll be setting up VSCode as an editor to work with files remotely over SSH during the session. As a first step beforehand, please install VSCode and the Remote-SSH and Microsoft's python extensions using the instructions below.
-
Download and install VSCode
-
Install the
Remote - SSHextension:- Press
ctrl+shift+x(Linux/Windows) or⌘+shift+x(MacOS) to open the extensions menu - Search for and install
Remote - SSH
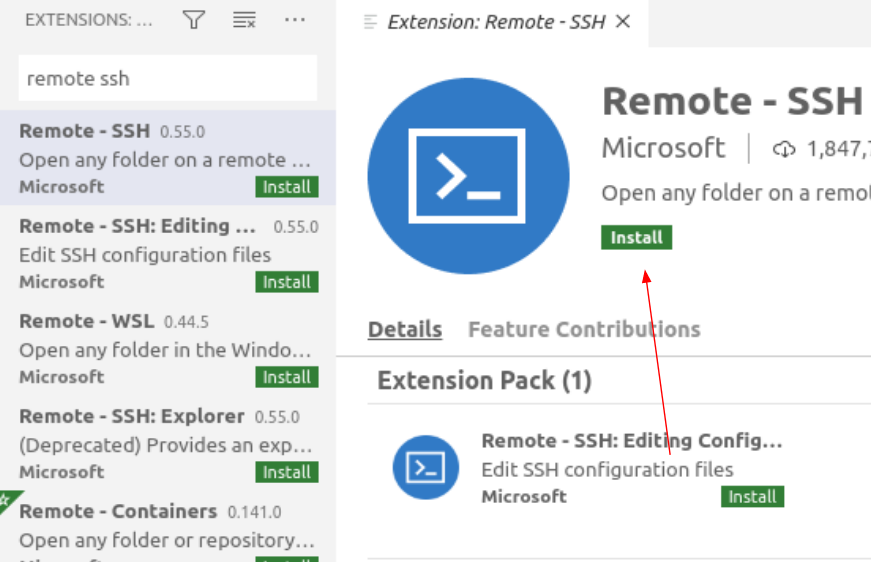
- At this time, also search for and install the microsoft
Pythonextension.
- Press
Living the command line

Getting started: SSH to the server (if you're not already connected)
Open up a wsl/*nix/gitbash terminal and connect to the server with:
ssh {andrew_id}@server.mlpolicylab.dssg.io
Some key Linux concepts
Linux Paths
Absolute paths:
An absolute path is a path that starts at a system's root directory.
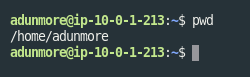
For example, the command pwd will print the absolute path to your current directory:
To refer to a location using an absolute path, specify your path starting with a /
Absolute paths are as unambiguous as possible. However, they're not as convenient as...
Relative paths
A relative path specifies the path to some folder or file, relative to the current location.
To use a relative path, specify a path not starting with a /
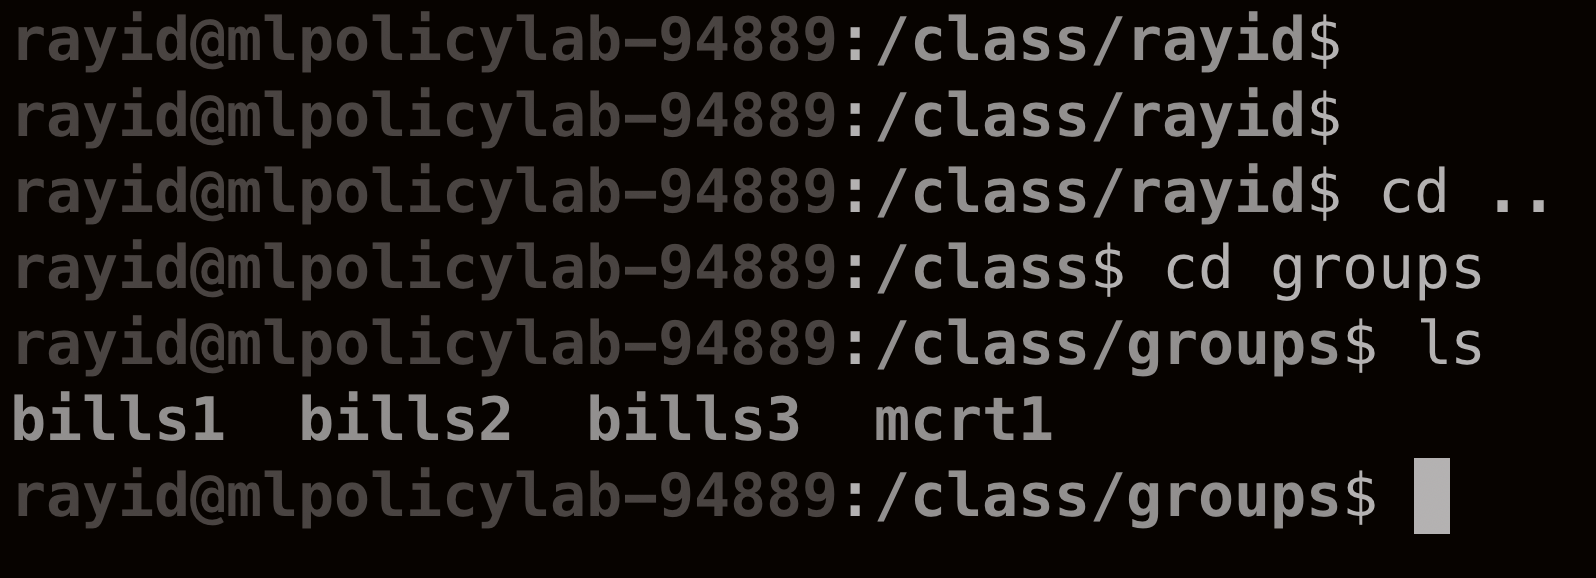
An example:
- I start in
/class/rayid/ - I go up one level by typing
cd ..(get to /class) - I then use
cd groups(note: doesn't start with/) to go to the project groups directory - I've changed directories to
/class/groups/
The home directory
In Linux, each user has a "home directory". This is the default directory a user enters upon login.
You can access your home directory with the command cd ~.
You can also specify absolute paths in a similar way:
- My home directory is
/class/rayid - I can access the folder
mlforpublicpolicylabstored in my home directory withcd ~/mlforpublicpolicylab
Anatomy of a Linux command
Linux commands share a basic syntax. Let's take a look at one to see how it works:
ls -l --human-readable ./mlforpublicpolicy
This command contains four parts:
ls: This is the name of the command we're running. ls is a utility that lists the files and folders present in a directory. The command name is always the part that comes first.
-l & --human-readable: Both of these are options. Options are used to change the behavior of a command. Options usually start with one or two dashes (one dash for single-character options, two for longer options).
-l tells ls to give detailed descriptions of all the files it lists (including size and permissions). --human-readable is self-explanatory: it tells ls to make its output easy to read.
./mlforpublicpolicylab: This is the argument. Here, it's a relative path to the folder that we're telling ls to list the contents of. Most Linux commands take an argument - often text, or a file or folder to operate on.

Getting help
Linux makes it easy to get help with a command:
man {command}
Opens the manual page for the command in question. Many commands also offer a help menu accessible with {comand} --help
Some key command line tools
At first, it can be tough to do basic things like browsing folders or editing text in the command line. But Linux includes a lot of helpful tools for these kinds of tasks. In this section, we'll show how to use some of these tools to get around the terminal.
Follow along by executing the commands on the numbered lines.
- Connect to the course server with SSH (if you aren't already)
Getting oriented:
Let's start by getting our bearings inside of the filesystem.
First, let's figure out where we are, with pwd:
pwd prints the absolute path of the current working directory.
- Print your current working directory:
pwd
Next, let's find out what's in our current directory, with ls:
ls {some_folder (by default, the working directory)}
lists the files in a directory.
- List the files in your home directory:
ls
Making files
Let's start doing some work. Start by using mkdir to make a new directory:
mkdir {folder_name}
Creates a new folder
- Make a new directory:
mkdir my_test_dir
Now, let's change into our new directory to do some work, with cd:
cd {some path}
Changes the working directory
- Move to your new directory:
cd my_test_dir
Make a new empty file with touch:
touch {file_name}
Create a new file
- Make a new (empty) file:
touch a_test_file
Editing text in the command line
Nano is a barebones text editor available on most Linux computers. While it's not as nice to use as something like VSCode, it's still quite convenient for making quick edits from the command line.
Start Nano like any other commandline tool:
nano filename
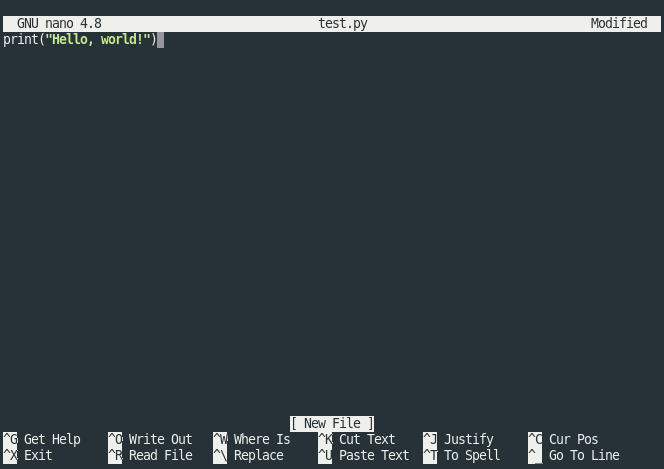
You should see something like this. The options along the bottom are keyboard shortcuts for controlling Nano. Here, ^ means ctrl. For example ctrl+x exits Nano, and ctrl+w searches the open file.
The top part of the screen is the editor. You can move your flashing cursor with your arrow keys.
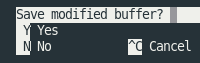
If you make changes and exit, Nano will display the following message, asking if you'd like to save. Press y to save, n to exit without saving, or ctrl+c to cancel and continue editing.
Let's try it out:
- Open the file you created in step 6 with
nano, and put some text in it:nano a_test_file- Type something you learned in this tech session
- press
ctrl+c, thenyto save and exit
Let's use cat to make sure our changes worked:
cat {filename}
Prints the contents of a file (works best with text-based files)
- Print the contents:
cat a_test_file
Moving files
Let's learn some tools for manipulating existing files.
Let's start by copying our text file, with cp:
cp {source} {destination}
Copies the file at source to destination.
- Make a copy of your file, named "another_one":
cp a_test_file another_one
Now, let's move that new file, with mv:
mv {source} {destination}
Moves the file or folder at source to destination.
- Move the copy to your home directory:
mv another_one ~/
Finally, let's delete that file with rm (turns out we didn't need it after all)
rm {file}
Remove (delete!) a file
- Remove the copy file:
rm ~/another_one
Background tasks with screen
In this class, you'll often want to run long-running jobs in the terminal. However, by default, any tasks left running when you log out of ssh will be closed.
We can get around this with a Linux utility called screen. Screen is a "terminal multiplexer". That is, it allows you to keep run multiple terminal sessions, and keep them active even after you've logged off.
Screen allows us to start a process (like a long-running python script), put it in the background, and log off without cancelling the script
Running screen
- Log into the course server with ssh
- Open a new screen session:
$ screen
You should see a screen with information about screen (licensing, a plea for free beer, etc). Press enter to bypass this. This will open a fresh terminal session, with your terminal history should be cleared out.
- Verify that you're in a screen session by listing the open sessions owned by your account:
$ screen -ls
>There is a screen on:
>        18855.pts-44.ip-10-0-1-213      (09/30/20 18:32:05)     (Attached)
>1 Socket in /run/screen/S-adunmore.
One session is listed. It's labeled as (Attached), which means you're logged into it.
- Let's give our system some work to do. Run the following command, which will start a useless but friendly infinite loop:
$ while :; do echo "howdy do!"; sleep 1; done
Note that at this point, you could safely log off of ssh. Your loop would still be here when you logged back on.
- Now that your screen session is busy, let's go back to our default session to get some work done.
pres ctrl+a, release those keys, and press d.
You should return to your original terminal prompt.
- Check that your screen session is still there: run
screen -lsto list open sessions again. This time, the single open session should be labeled as(Detached), which means that you're not viewing it.
Note the 5-digit number printed at the beginning of the line referring to your screen session. We'll use that number to log back into that session.
- Let's return to our session and kill that loop - we don't need it anymore.
We'll use screen -r. This reattaches the named screen. Use the 5-digit number from step 6 to refer to that session:
screen -r {screen session number}
You should now be back in your old terminal session, where that loop has been "howdy"-ing away.
Press ctrl-c to close that loop.
- Now we can close this screen session. Simply type
exitin the command line.
This should kill our session and return us to the command prompt. If you'd like, confirm that your session is closed with screen -ls.
Some notes:
- You can name your session, with the
-Sflag:
$ screen -S some_name
Once you've assigned a name, you can use it to reattach your screen sessions, which is easier than remembering/looking up a number.
- You can use
screen(and any of the utilities introduced here) in your VSCode terminal. Just pressctrl+cto exit your python session (if you're in one), and you'll be able to enter these commands just like a regular terminal session.
Remote development with VSCode
Why VSCode over SSH?
This section will introduce one convenient workflow for developing code on the remote server.
VSCode is an IDE that provides a lot of useful tools for developing Python, including autocomplete, syntax highlighting, support for virtual environments, and shortcuts to run python files.
With the VSCode SSH extension, VSCode can access code and other files stored on a remote computer. Furthermore, it can run any code stored on the remote machine.
This has several advantages:
- You don't have to keep any code stored on your local computer - you only need one copy, stored on the course server
- You don't have to copy code between your computer and the course server. Instead, VSCode lets you edit files where they're stored on the course server.
- VSCode makes it convenient to run code stored on the course server. When you're developing this way, you'll always have access to the database and your group's virtual environment.
Note: This workflow isn't required - it's just one "good enough" approach that we think many of you will find convenient. Please feel free to use other workflows if you're already set up and comfortable with them.
Configuring VSCode SSH
-
Download and install VSCode
-
Install the
Remote - SSHextension:- Press
ctrl+shift+x(Linux/Windows) or⌘+shift+x(MacOS) to open the extensions menu - Search for and install
Remote - SSH
- At this time, also search for and install the microsoft
Pythonextension.
- Press
-
Configure our course server as an SSH host:
With the SSH plugin installed, we can tell VSCode how to log into the server. In this step we'll be entering our connection string and saving it in a file, making it easy to connect in the future.
- Press
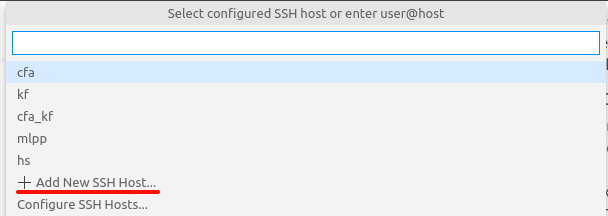
ctrl+shift+p(Linux/Windows) or⌘+shift+p(MacOS) to open the command palette, and selectRemote-SSH: Connect to Host

- Select
Add New SSH Host...
- Enter
ssh -i {andrewid}@server.mlpolicylab.dssg.ioif you have trouble here,m tryssh -i {path to your private key} {andrewid}@server.mlpolicylab.dssg.io

- Select the first option to store your login config:
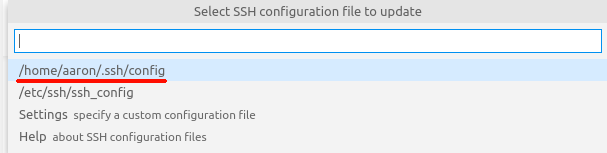
- Press
-
Connect VSCode to the course server:
- Connect to the CMU VPN (if you're not on CMU-Secure wifi network)
- Press
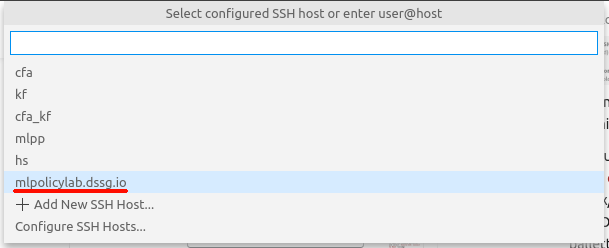
ctrl+shift+p(Linux/Windows) or⌘+shift+p(MacOS) to open the command palette, and selectRemote-SSH: Connect to Host
- Select the ssh config we just created:
server.mlpolicylab.dssg.io
-
Enter your private key passcode if VSCode prompts you to (it will open a box at the top of the screen).
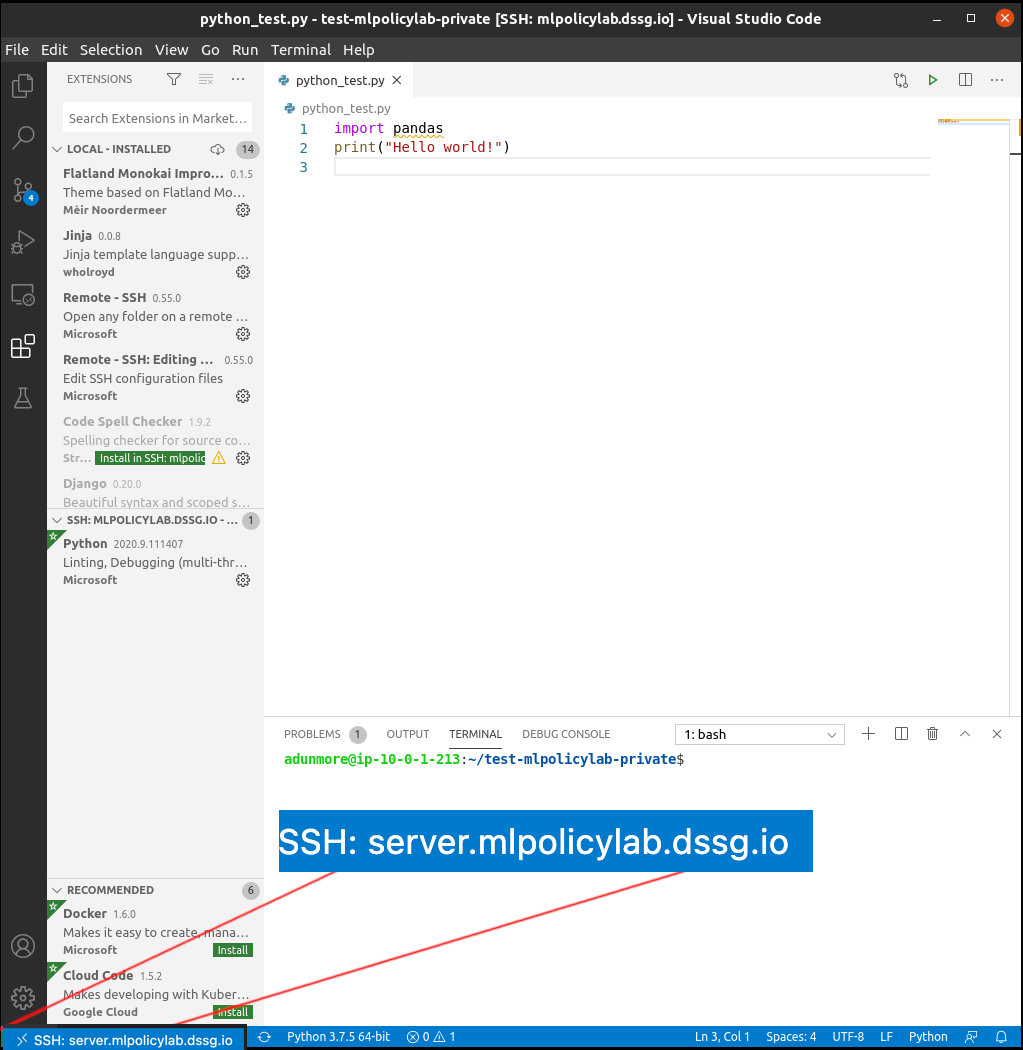
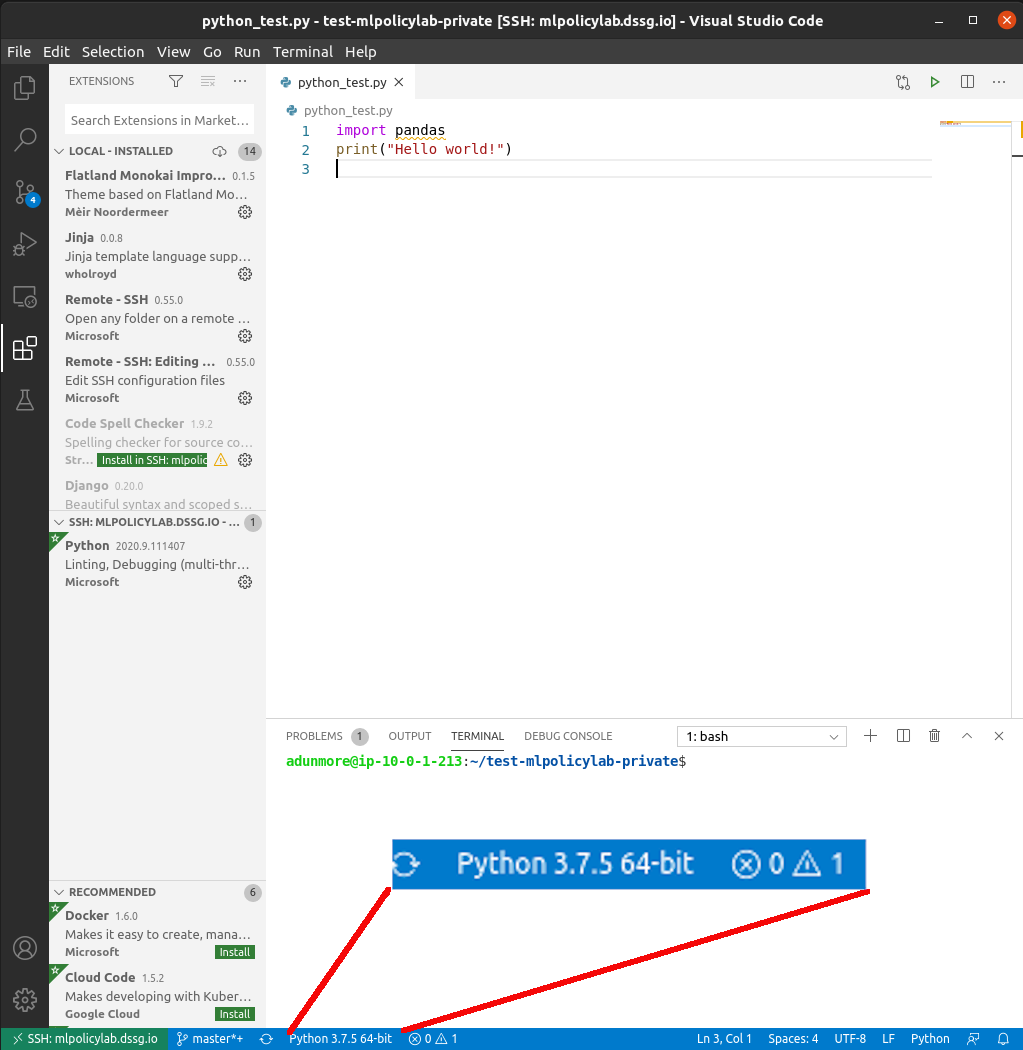
-
You should be connected to the course server. This should be indicated in the bottom of your VSCode window:
-
Open a workspace folder:
Now that VSCode is connected via SSH, you can browse all of the files and folders on the course server. In this step, we select a folder containing some code to edit and test.
- Select the folder menu button
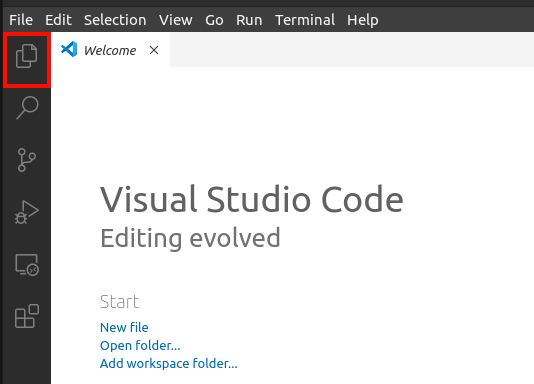
-
Select
Open Folder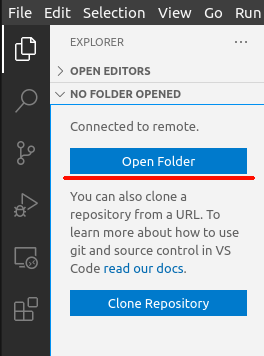
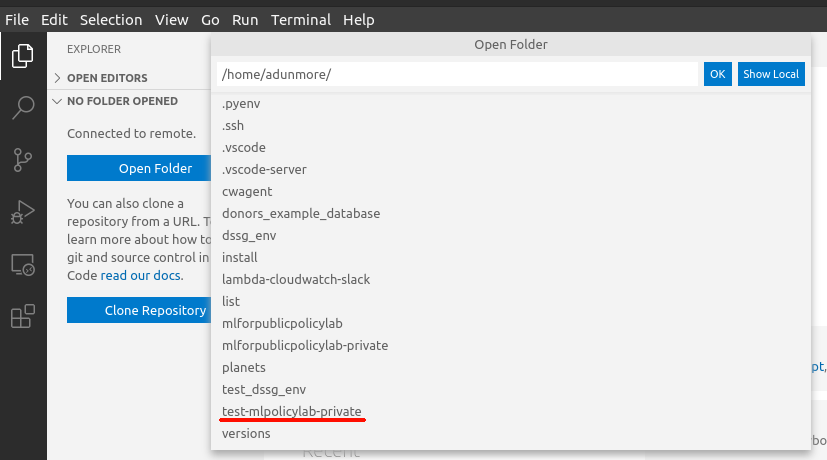
-
Select a folder to work in
-
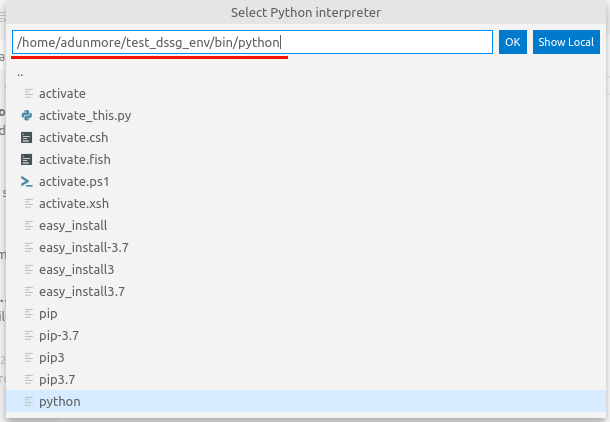
Select your python virtual environment:
VSCode can be configured to automatically run python code in a virtual environment. Here, we'll select and activate our group virtual environments.
- Press
ctrl+shift+p(Linux/Windows) or⌘+shift+p(MacOS) to open the command pallette, and selectPython: Select Interpreter

- Select
Enter interpreter path
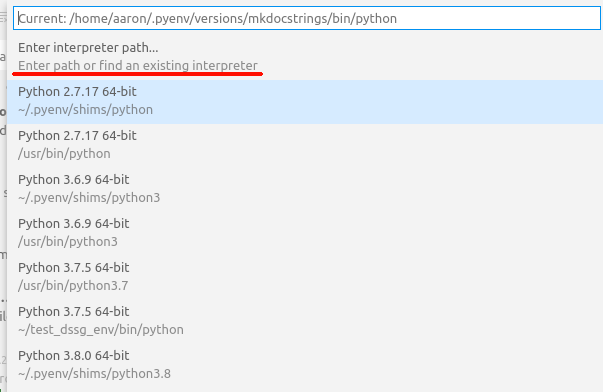
- Select
Find...

- Enter the path to the python executable in your virtual environment:
/path/to/your/environment/bin/python(/class/{andrew_id}/.pyenv/shims/python).
- After a moment, your selected python interpreter should be activated. This should be indicated in the bottom of your VSCode window:
- Press
-
Run python!
- Open the folder menu and select a python file (or press
ctrl+n(Linux/Windows) or⌘+n(MacOS) to create a new one)
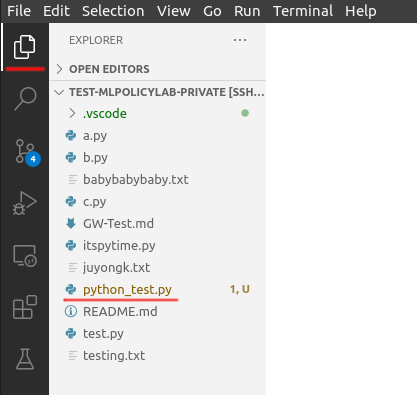
- Click the green "play" button at the top of your window. This starts a new terminal session, activates your virtual environment, and runs your python code.
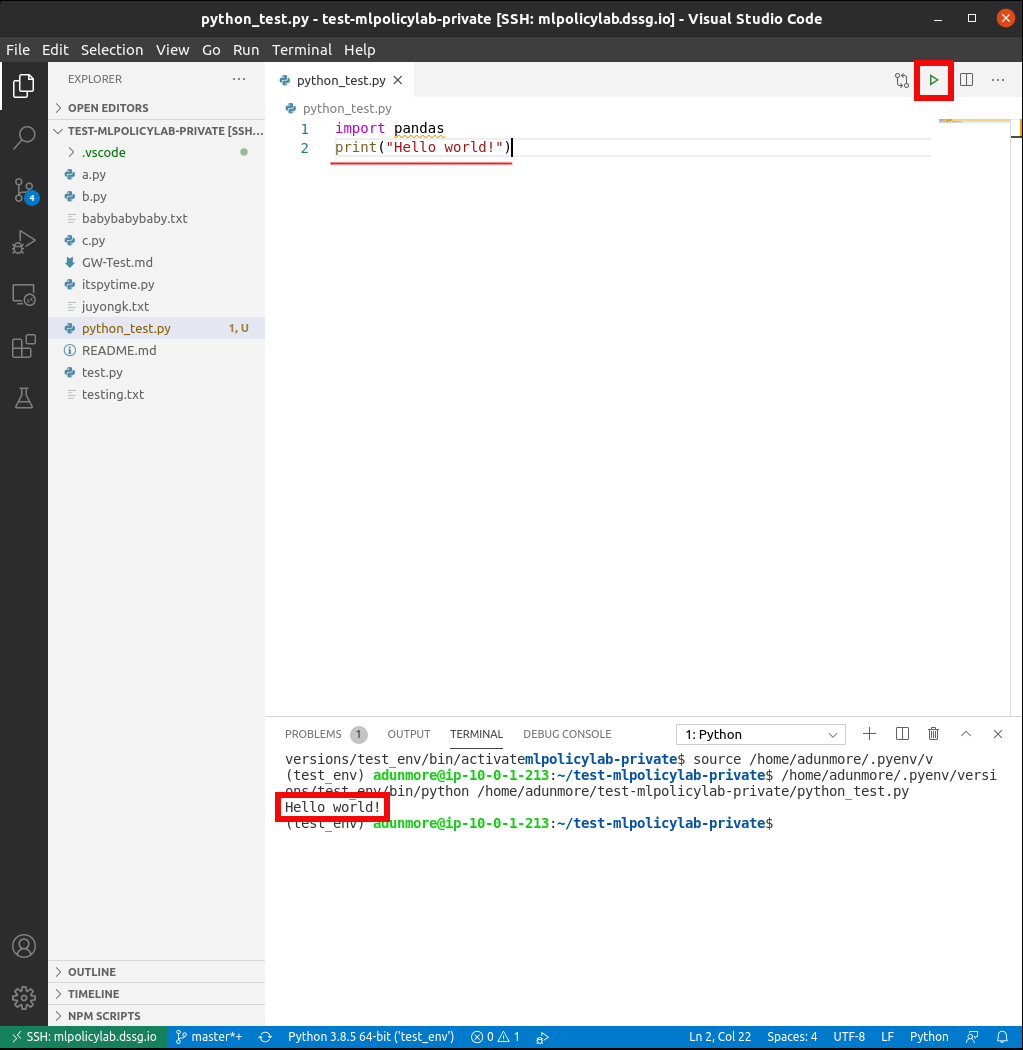
- Open the folder menu and select a python file (or press
Remote development with Jupyter
We're not going to cover this becuase you can use vscode for notebooks but we are keeping it here for those of you interested in doing it over a browser later on in the semester.
How does it work?
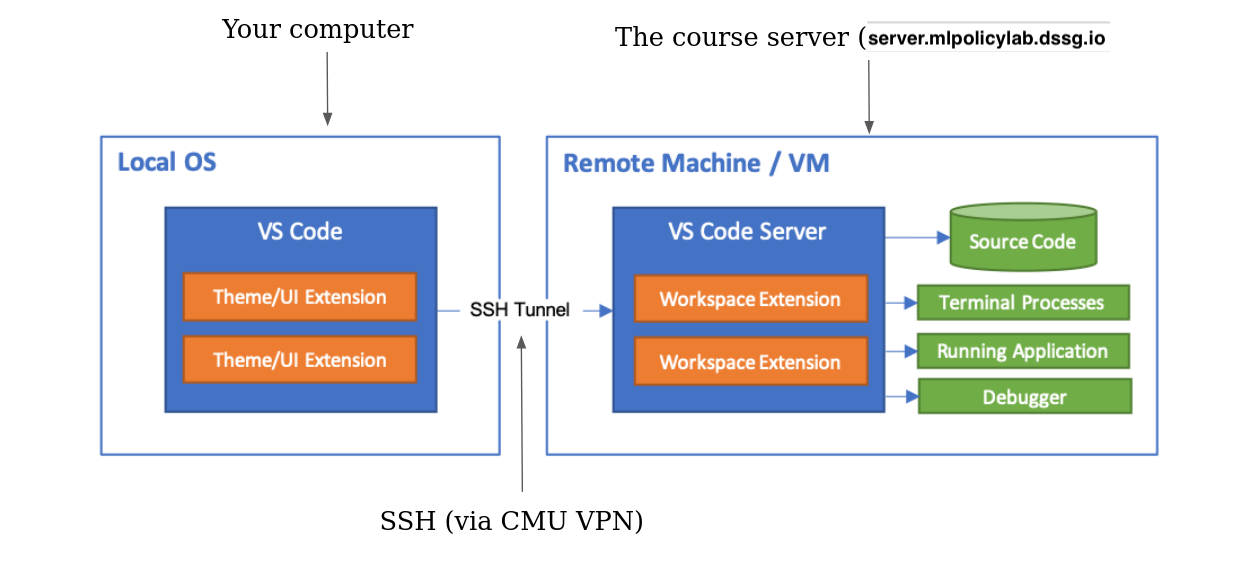
Conceptually, this similar to how VSCode works over SSH:
- The remote machine (our course server) hosts a jupyter notebook server that does things like loads files, runs python, activates virtual environments
- Your web browser connects to that server and presents a frontend interface for opening, editing, and running notebooks
- These connect using SSH (inside the CMU VPN)
Setting it up
-
Connect to the CMU VPN
-
Connect to the course server using SSH
-
Find an open port on the course server to send your Jupyter traffic through:
- In the terminal (on the course server) type
ss -lntu. This will list all ports - Pick a port number between 1024 and 65535 that is NOT on that list.
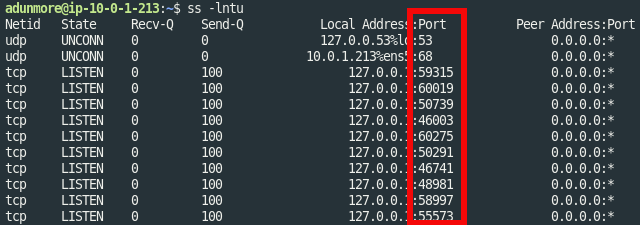 (numbers in this box are ports currently in use)
 - In the terminal (on the course server) type
-
Change to your group project directory (e.g.,
/class/groups/{group_name}) to activate your virtual environment- If you want to confirm your virtualenv has properly activated, run
which python-- this should return/class/{andrew_id}/.pyenv/shims/python. If you get anything different (or nothing at all), your virtualenv hasn't activated correctly!
- If you want to confirm your virtualenv has properly activated, run
-
On the course server, start your notebook server:
- In the server terminal (inside SSH), run
jupyter notebook --no-browser --port {your port from step 3}(note: to ensure this persists, you may want to start your server in ascreensession as discussed above!) - When the server starts, take note of the URL printed in the server terminal output:
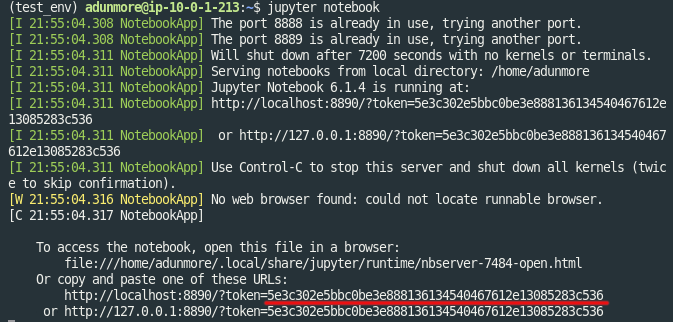 (the token is printed multiple times)
 - In the server terminal (inside SSH), run
-
On your local machine, set up an SSH tunnel. This will allow your web browser (on your local computer) to reach your Jupyter notebook server (on the course server):
- In a new local wsl/*nix terminal (not via ssh): type
ssh -i {path to your private key} -N -L localhost:{your port from step 3}:localhost:{your port from step 3} {andrew_id}@server.mlpolicylab.dssg.io
- In a new local wsl/*nix terminal (not via ssh): type
-
Open the notebook on your local machine:
- Open a web browser and navigate to URL generated when you started the server, including port and token (e.g.,
http://localhost:{your port from step 3}?token={some long token}). Iflocalhostdoesn't work, you may want to try127.0.0.1or0.0.0.0instead. - Note that if you're re-opening jupyter after a while, it may take you to a login page asking you to enter the token generated in step 4.2. Enter that token to proceed.

- In the next screen (which should be a view of the folders and files in your working directory):
- To create a new notebook, click the
Newdropdown, and selectPython 3. This will create a new notebook using your group's virtual environment. - Or you can double click an existing notebook to open it.
- To create a new notebook, click the
- Open a web browser and navigate to URL generated when you started the server, including port and token (e.g.,
-
IMPORTANT: Be sure to explicitly shut down the kernels when you're done working with a notebook. Leaving "zombie" notebook kernels open can use a lot of unneeded resources!

Shutting down
You'll need to do two things to shut down your notebook server:
- Kill the notebook server on the remote machine (return to the terminal/screen window where the server is running and type control-C then
ywhen prompted if you reall want to shut down) - Close the SSH tunnel on your local machine: on linux/macos/windows wsl, you can do so by running
ps aux | grep {YOUR_PORT}to find the process id (PID) then usingkill {PID}, or alternatively closing the terminal session you used to start it. If you're using putty or powershell on windows by any chance, you should simply be able to close the window where you started the tunnel.
Understanding the class remote workflow
Your machine is a client
You can think of your machine "client" in our system. This is because it doesn't do much of the computational heavy lifting. Rather, it views data stored on the database, uses utilities running on the server, and edits and runs code in the server's environment.
SSH tunnelling
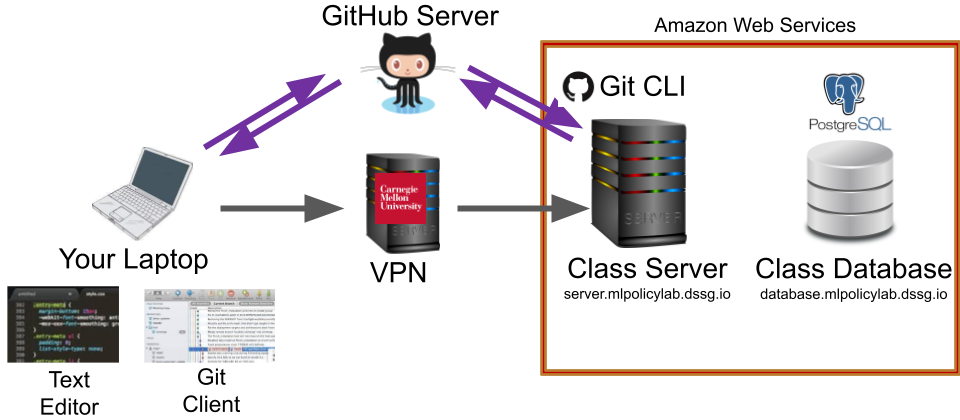
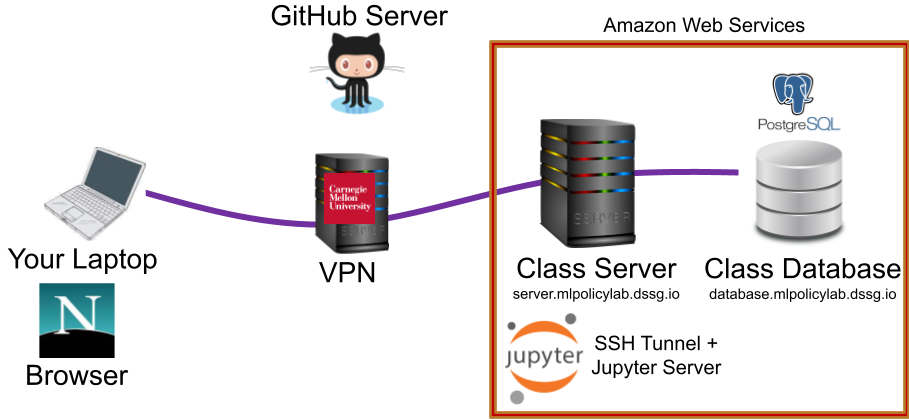
Since our projects involve sensitive, personal data, we keep the course server and database inside of a secure network hosted by Amazon Web Services. The course database and server are the only computers on the network. They cannot talk to computers outside of the network, with two exceptions:
- The course server can access the web (ie to download files from a website or query the census.gov api)
- The course server accepts SSH connections through the CMU VPN
External computers cannot connect directly to the course server.
We can use SSH to get inside this network. We use SSH in two main ways:
- We use SSH to access the course server terminal. We can use this to access files stored on the server, and run programs like
python,psql,nano, etc. - We use SSH to open tunnels through the course server, to the course database. An SSH tunnel allows a client computer (ex: your laptop) to connect securely to any application accessible from a remote server (ex: our course server). For example:
- We run Jupyter notebook servers on the course server. We can use an SSH tunnel to open hosted notebooks on our local computers
- The course server can connect to the course database. We can use an SSH tunnel to allow local applications like DBeaver to connect to the course server, via the course server.
Interested in a deeper dive? Here's an article on SSH tunneling.
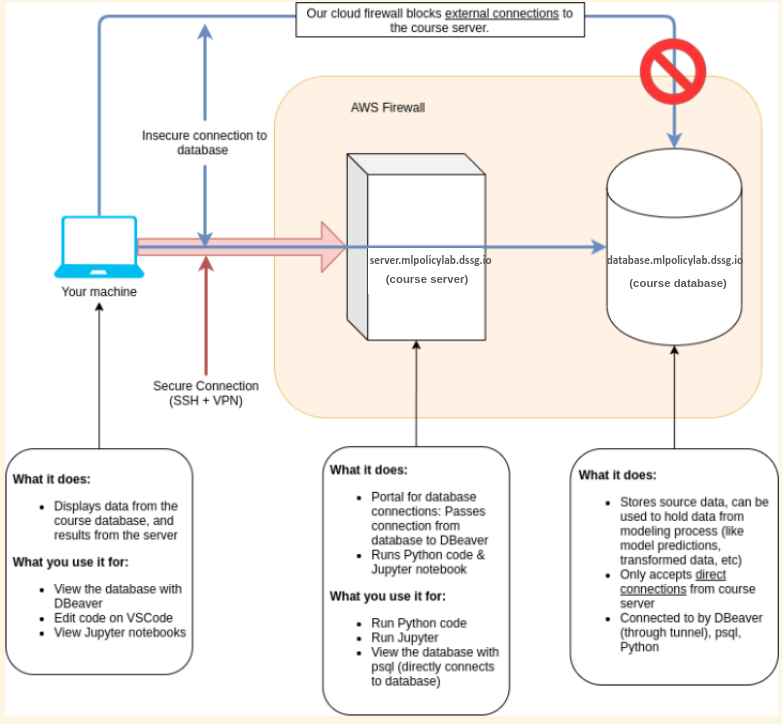
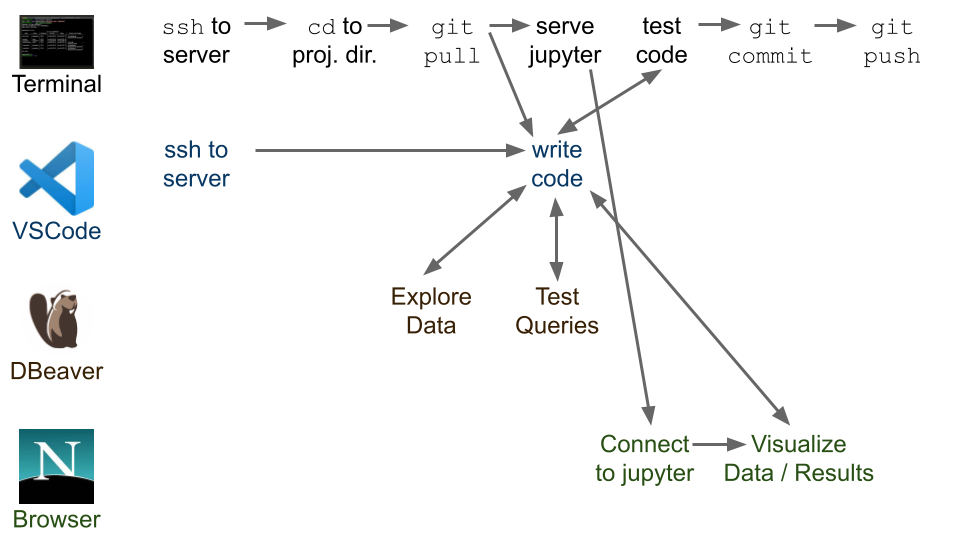
A diagram illustrating the class architecture.
Workflow Cheatsheet
Here's a typical workflow to get you started:
- ssh to the server
- start a screen session or reconnect to an existing one
screenorscreen -r - go to your project directory
cd /class/groups/{group_name} - go to your own directory inside where you cloned the github repo
cd name_of_your_directory - do a git pull to get updates
git pull - open VSCode on your laptop and make sure to connect via the ssh connection to the server
- write/edit code
- go back to the ssh connection you have open in wsl or termianl. run the code with python (make sure you're in a screen session if it's a long run)
- if everything looks good, do a git pull (in case anyone has pushed code while you were working), git commit and push